
This post documents the making of a set of 29 tuning pins, starting with my turned brass pin blanks.
Continue reading Making a set of pinsTag: tuning pins
Making tuning pins
This post describes my method of making tuning pins. It is a labour-intensive process and though I am taking orders for sets of pins, I think my pricing does not really cover the work involved. But I want there to be more harps with beautiful handmade pins! I’m posting this so that if anyone else wants to take on the manufacture and supply of pins like this, they can get some ideas from what I have worked out.
Design
I want my pins to be the same as the old Irish harp pins. This is harder than it sounds because it is very difficult to accurately measure the old pins. I have been studying a combination of photographs of the old pins, and accurately calibrated laser-scans. The problem with the laser-scans is that there are a lot of scanning artefacts on the tuning pins; the problem with photographs is that perspective and parallax makes the tapers and exact sizes very difficult to assess.
For the reconstruction copy of the NMI Carolan harp, I chose one of the pins and made a paper template full-size from the laser-scan. I am also interested in copying some of the archaeological pins such as the ones from Montgomery Castle. It is also possible to come up with a kind of generic design pin that is not an exact copy of any one old pin, but which fits into the general scheme.

I also tried making resin casts of the Monaghan pin, but this is not a particularly good pin since the shaft is not parallel and circular. Even then it was very hard to accurately measure its size.
I think that for functioning pins we need to control the taper and diameter of the shaft, and we need to control the taper and width of the drive. I am doing this by using commercial standard tapered shafts, and then hand-shaping the heads to fit with standard sized gauges.
Shafts
I’ve been using Dan Speer‘s brass shafts. I haven’t yet found a supplier in the EU; but Dan is efficient and friendly to deal with. I also ask Dan to drill the string hole for me. I ask him to make the hole a bit smaller than usual, and closer to the end. The blanks are expensive, and so is shipping and import duty.
I have been experimenting with different size blanks. They are sized according to the Imperial taper system, with a 1/48 taper. The blanks are specified by a length and a number; the number refers to the diameter of the large end of the pin. This means that the longer the pin, the smaller the small end is. Sometimes I cut the wide end of the head off to make the blank shorter; this of course makes the whole pin more slender than if I had used a shorter pin of the same number.

Heads
For the heads, I buy square-section brass rod. This is available in standard sizes. The rod needs to be at least as wide as the wide end of the shaft; so for no.4 shafts I would buy 1/4″ (6.4mm) square rod. If I am using no.5 pins, then I need to get the next size up which is typically 3/8″ (9.5mm). Ideally the rod should be about the same size, so for no.5 pins the rod should be 7.5mm, because anything bigger than that will just need filed away.
Assembling heads and shafts
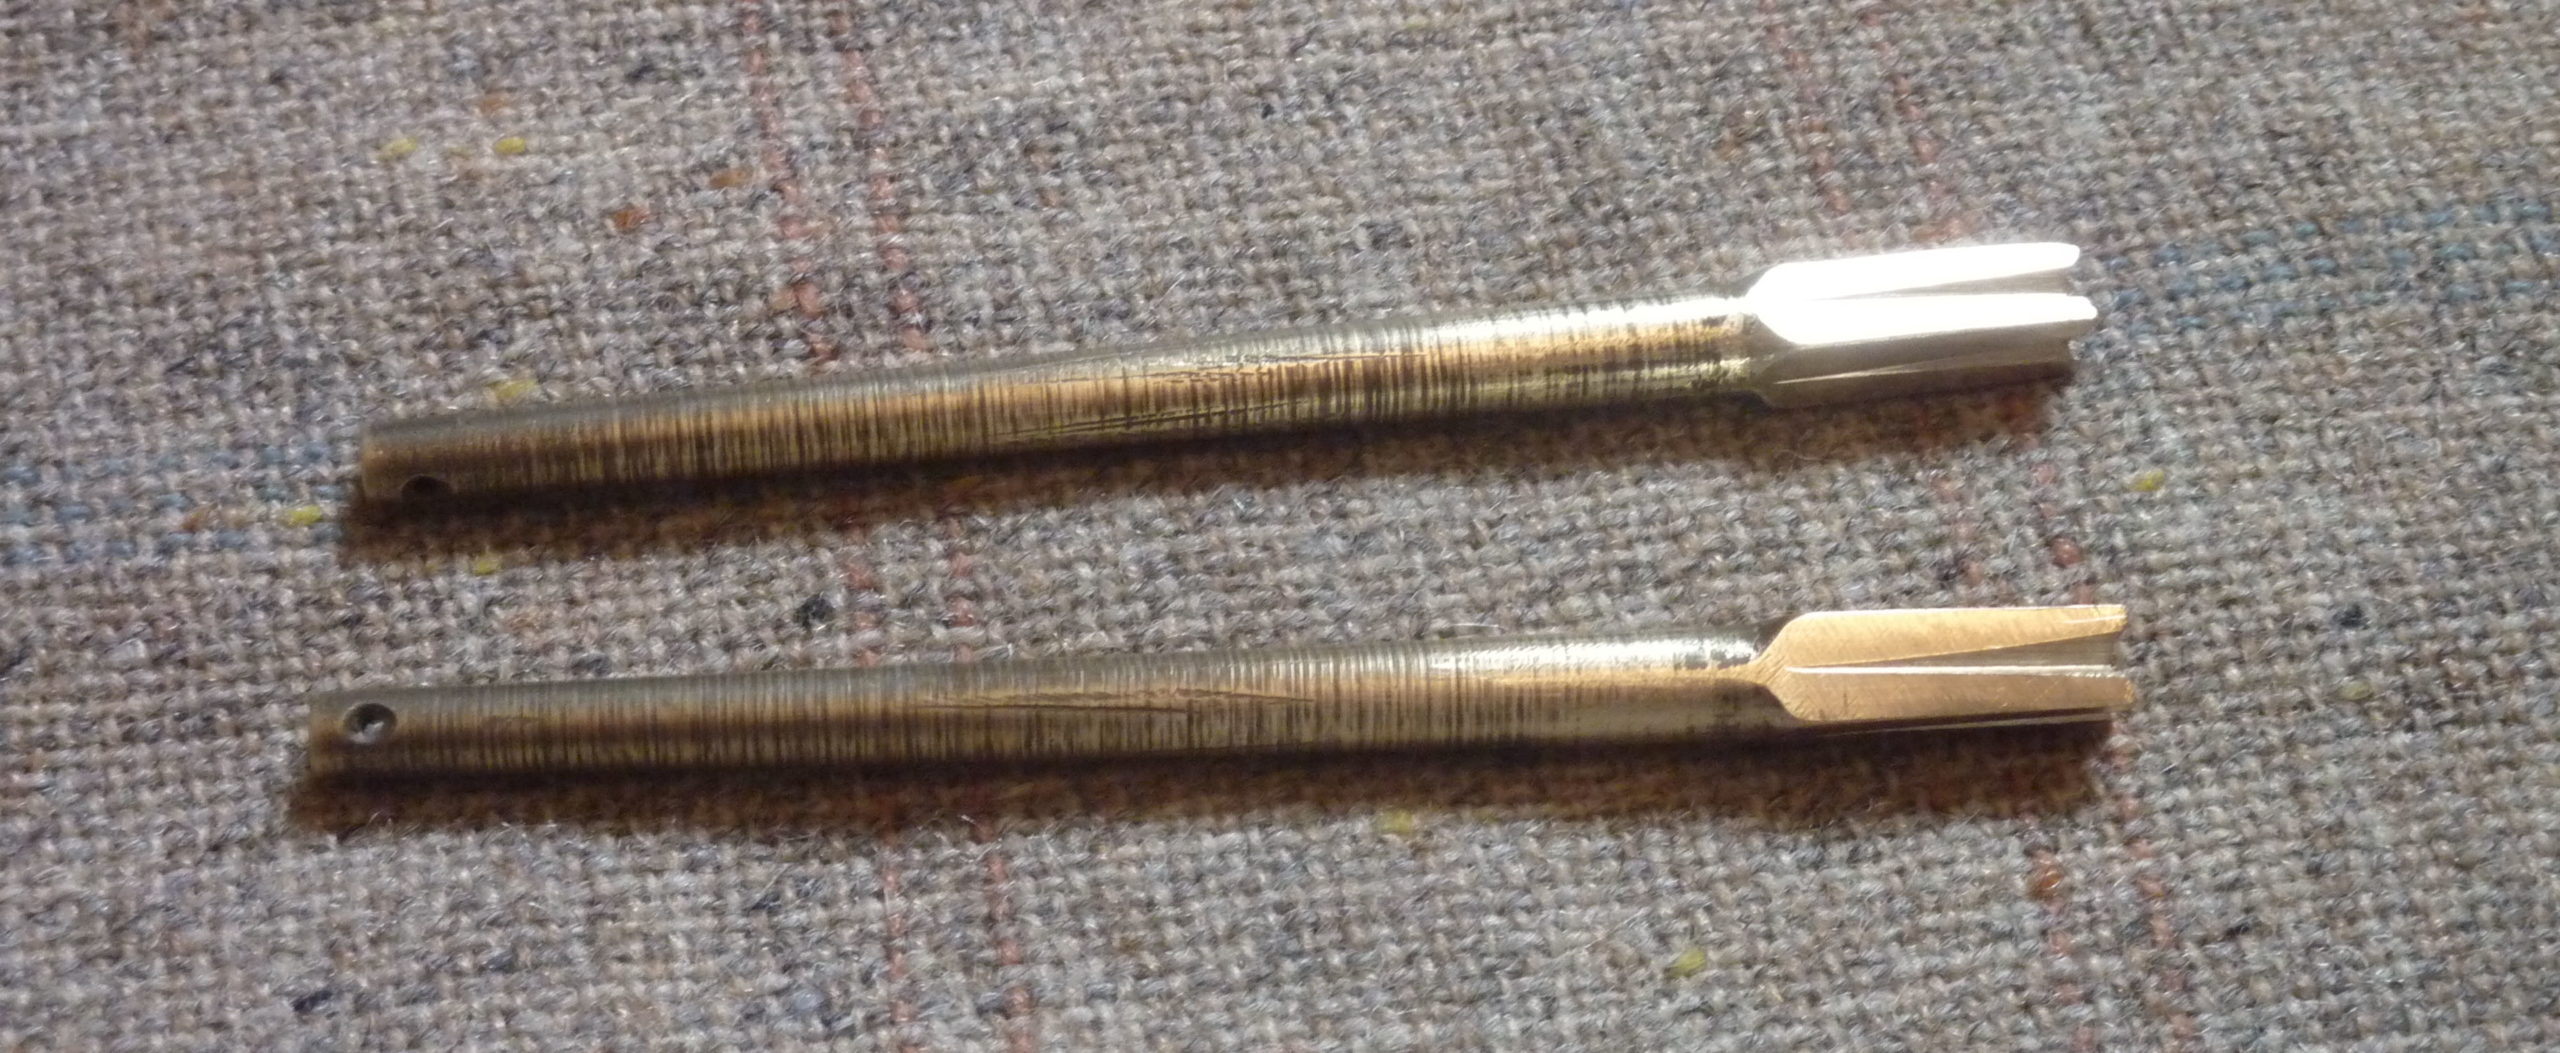
The head is cut from the square rod with a hacksaw. For consistency, I use a caliper / divider to mark the length of the head.
The shaft can be used as is, or can be cut down. I started making my pins using the blanks as is, and then I realised that this made my pins a bit thicker than modern machined harp pins of the same nominal size. That’s because I was adding the head to the wide end of my pin, whereas a modern machine-made pin cuts the head down into the wide end of the blank. So, my preference now is to cut a short length off of the wide end of the pin.

In the example from my notebook, I would cut the head from 1/4″ square brass rod, cutting a piece 18mm long. I would take a pin blank, #4 x 3 1/2″ (i.e. no.4 x 89mm). I would mark 75mm from the small end, and cut off the remainder of the fat end.
Then I would carefully file the cut ends flat, so that they would fit together closely.
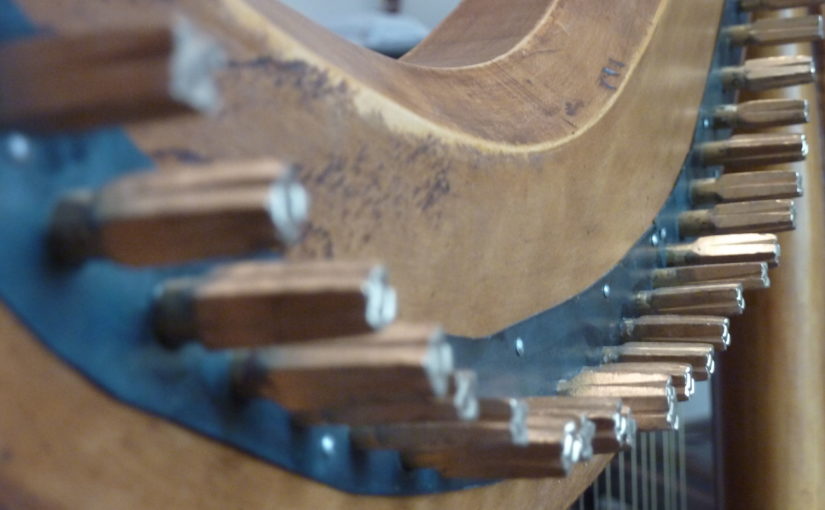
I use a blowtorch and silver-solder to join the shaft and the drive. This is tricky and precision work. I use firebricks to hold the pieces together under their own weight, standing the shaft wide-end-down on top of the head, with just a nice amount of flux powder. When they are almost red-hot the solder can be touched to the joint to melt in, and then more heating will bring the brass to red-hot and the solder will flow throughout the join and make nice wide fillets at the four corners of the head.


Then the heads are filed. Care is needed to make the inner, wider end of the head just flush with the shaft; the outer, narrower end is tapered gradually down.
I use standard clock-keys as measuring gauges to judge the taper of the heads; for the example no.4 pins my notebook indicates how far onto the tapered head two clock keys will fit; a no.13 (5.5mm) key will fit about halfway down the drive, and a no.12 (5.25mm) key will fit just a few mm down the end of the head. I think I would use a 5.75mm socket on a tuning key for these pins.

Finally, the V-shaped grooves on the drive are made, with fine needle files. Different original pins have different configurations of these decorative grooves; their specific shape and depth gives a lot of the character to the pins. For these no.4 pins I made the grooves on the drive faces very deep and tapering; the diamonds on the drive ends were also cut very deep and then shaped to give a “clove” effect. Other pins I have made have much shallower grooves which give a more two-dimensional look, more like engraved lines. Some pins also have lateral incised lines running around the drive end.
I don’t believe this is how the old craftsmen made brass tuning pins. I think it is much more likely that the old pins were cast and/or turned on a lathe. I have seen modern cast and turned copies of the old pins, and they look very nice. But I don’t have either foundry equipment, nor a lathe. Also it seemed important to me to fit in with modern norms and to use the modern 1/48 Imperial taper shafts, just like other harps.
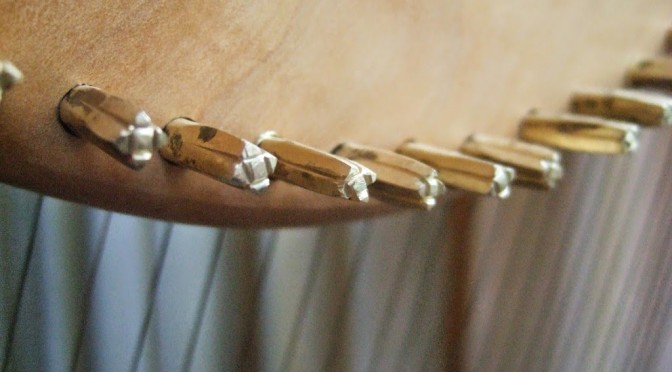
My header image shows the pins I made for the reconstruction copy of the NMI Carolan harp, which was made for me by Pedro Ferreira.

A typology of tuning pins
There are a number of different styles of taper harp tuning pins. I am trying to categorise them so that it is easier to be specific when talking about the different types. Up to now I have talked about the “old” style with fat drive heads, and the “modern machine-made” style with narrow heads. But I see now that these are rough categories, which can be broken down more subtly.
I think the most distinctive and diagnostic thing is the relationship between the drive and the shaft. The drive is the square- or rectangular-section end of the pin, which is where you put the tuning key on, to turn the pin. The shaft is the conical main part of the pin, which is embedded in the wood of the neck, and also which carries the string at the far end. The shaft is always, and the drive usually, tapered rather than parallel-sided.
Basically I think the first diagnostic is whether the head is wider or narrower than the shaft; in other words whether there is a step up or a step down to the head from the shaft.
I’d suggest Type 1 pins have a step up from the shaft to the head; Type 2 pins have the head about the same size as the shaft, and Type 3 pins have a step down from the shaft to the head.
We could have sub-categories; sub-type a could have a sharp step at about 90°; sub-type b could have a clear transition at about 45°; and sub-type c could have a very smooth flat transition. We could also append R for pins with rectangular (not square) drives.

Because both head and shaft taper away from the centre of the pin, and because there is often a gradual transition from shaft to head, it can be hard to state at what point the diameter or width of each part should be measured and compared. So while it is easy to think about comparing the width of the head with the width of the shaft, it is often difficult in practice to choose where to measure. So my idea of looking for the nature of the “step” between shaft and head might prove more useful.

Type 3a (modern #5×3″ steel pin)
Type 3a (modern #4×3″ steel pin)
Type 3b (steel pin from Arnold Dolmetsch harp no.10, c.1932)
Type 2c (iron pin made by Simon Chadwick for a replica medieval Gothic harp, 2018)
Type 2cR (iron pin made by Simon Chadwick for the replica Queen Mary harp, 2014)
Type 2cR (brass pin made by Simon Chadwick for the replica Queen Mary harp, 2007)
Type 1b (brass pin made by Simon Chadwick for the replica Carolan harp, 2019)
Type 1c (brass pin from county Monaghan, c.17th century)
I think that previous attempts to document tuning pins have not been specific enough about where the measurements have been taken. The scheme below suggests where to measure:

B is the smallest diameter of the conical shaft of the pin
C is the largest diameter of the conical shaft of the pin
D is the largest width across the flats of the drive
E is the smallest width across the flats of the drive
F is the extreme end of the pin.
The following measurements can be taken to record a pin:
1. Distance A-B
2. Diameter at B
3. Distance A-C
4. Diameter at C
5. Distance A-D
6. Width across flats at D
7. Depth across flats at D
8. Distance A-E
9. Width across flats at E
10. Depth across flats at E
11. Distance A-F
From these measurements we can calculate the taper of the shaft, the range of sizes of tuning key socket which will fit the head, and the nearest standard taper hole that the pin will fit in. We can also work out the nearest standard taper blank to use for making a copy.

winding strings on to tuning pins
Having just re-wound a harp that had its strings wound on to the front of the tuning pins, I wondered if there was any evidence as to which way the old harpers wound their pins.

Quill shim
In Karen Loomis’s PhD thesis (volume 3, p.379-380) she prints two photographs of a shim from tuning pin hole no.23 on the Queen Mary harp. One shows the shim extracted; it is made from a split section of a feather quill.

On my replica, pins 29 and 30 have needed shimming for some years now. I had originally tried paper, and subsequently sheet brass, but I was inspired by this discovery, to pull the pins and try quill shims.

Opening up the harp
I have been thinking for a few years now about the shape of the inside of my harp, in light of the new information we have from Karen Loomis’s PhD research at the University of Edinburgh.
When I commissioned the harp from Davy Patton in 2006-7, the thing we were most lacking was info about the inside – the shapes of the joints, and the profile and thickness of the soundbox. Basically, we had to make a lot of educated guesses.
Since then, we have the CT-scans and other technical studies of the Queen Mary harp that Karen has been working on, and many of our guesses have turned out to be pleasingly correct, such as our choice of timber – willow for the soundbox, and a bent limb for the pillar – but we were quite wrong in our decisions on how to shape the soundbox interior.
Luckily, we had erred very much on the side of leaving the wood too thick, so last week I took the harp to Natalie Surina, of Ériú Harps in Oughterard, Connemara, for her to cut a lot of wood from inside the soundbox.
Tuning pin
I have acquired an interesting old tuning pin. This is an early Irish harp tuning pin, probably dating from the sixteenth to the eighteenth century. I bought it from an Irish antiquities and coin dealer, who told me it was found in Co. Monaghan.
I’m very interested to consider this in the context of the surviving old harps, and to think about how most of us nowadays use modern pins, and how the differences have implications for the use and tuning of the harp.

“Like medieval clockwork” – copying the missing Queen Mary harp iron tuning pins.
When I was commissioning my replica of the Queen Mary harp in 2006, I paid attention to the 30th tuning pin, which is obviously a later addition, shorter, made of iron, split end, different drive, and off the main row. This pin is now missing but I made a copy of it based on descriptions and old photos. I made the 29 brass pins with their scores on their shafts copying the museum photo of the 21 pins now in the harp, and for the 8 missing pins I made the same design of brass pins without scores.
If I had been more on the ball back then I would have noticed that those same old photos and descriptions I used for the 30th pins, also show the missing 8 from the main row, and those missing 8 are plain iron not decorated brass, and 5 of them have split ends.

So today’s project was to make 8 handmade iron pins, and install them in the harp. The contrast of the iron and brass pins is subtle but interesting in appearance, reminding me of my initial reaction to the handmade decorated pins: “like medieval clockwork”.
I broke the lowest gold B string taking it off but there was enough spare to rewind the toggle and reuse it. The string had thinned where it went over the pin – presumably a gradual process over seven years since I fitted it in 2007.
Pins
The past week or two have continued the making things theme. I have done a series of tuning keys as test-runs; I have made a page advertising them which I will send out for my 1st May Emporium Update.
I also have made the set of pins for my HHSI Student Downhill harp, and today while it was here with my student who has it, I fitted the pins – pulling each of the old steel pins out in turn and then replacing it with a new brass pin. I had to shim all of the brass pins because for some reason they are marginally smaller than the steel pins, and I used thin brass sheet to make the shims. Plenty of the antique Gaelic harps have brass shims in their pin holes and I find it works well.

We instantly noticed how much better the harp worked to tune, with the new pins – the key fits much more snugly on the new pins with their tapering drives, giving a much more positive touch to the tuning. And the new pins look rather good with their decorated drives. I am very pleased with the result.
I have always thought that handmade pins with tapering drives work so much better than machine made steel pins with parallel drives, but inertia has meant I have not bothered doing anything about it until now. Hardly anyone has handmade pins on their harps, even top players with quality decorated instruments. I can only think of 3 or 4 off the top of my head.
I am going to make a few more pins and then I think I will make a page advertising them for sale for the 1st June update! I think that this would make a fantastic upgrade to anyone’s harp, to replace the pins!