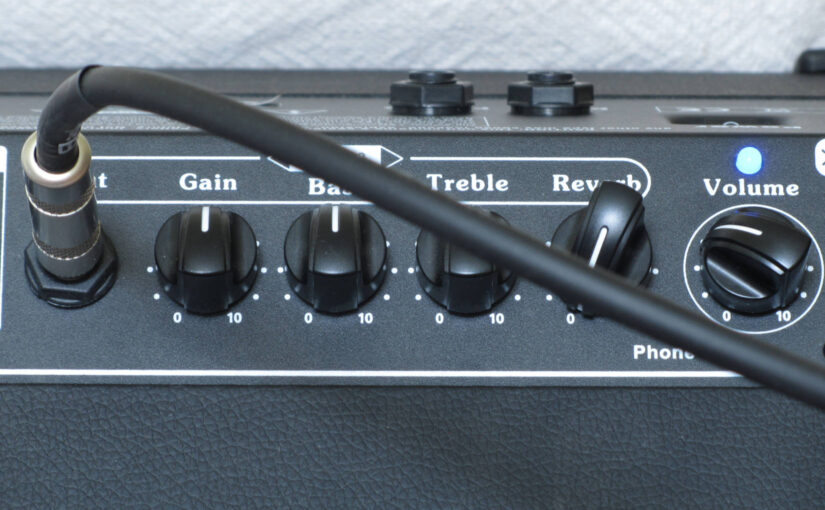
I have just installed a custom-made pickup into a second harp, and so this post is to document some aspects of this process for anyone else who is interested to make a DIY pickup system for their harp.
Continue reading Amplifying the harpCategory: harpmaker

New harp for sale
Pedro Ferreira has made a very interesting and nice new harp which he is offering for sale brand new. This is an unusual opportunity to acquire a new instrument from a respected maker of Irish harps, because normally instruments like this are only available as special commissions, with a waiting list.
Here is what Pedro has to say about it:
Continue reading New harp for sale
Making a tuning key
I thought it might be useful to do a photo-essay on how I go about making a tuning key. I think tuning keys are easy to make (they must be if I can manage!) and there is a lot of scope to adjust the design to make it work exactly how you want it to, in terms of appearance, ergonomics, and fit on the pin.
Continue reading Making a tuning key
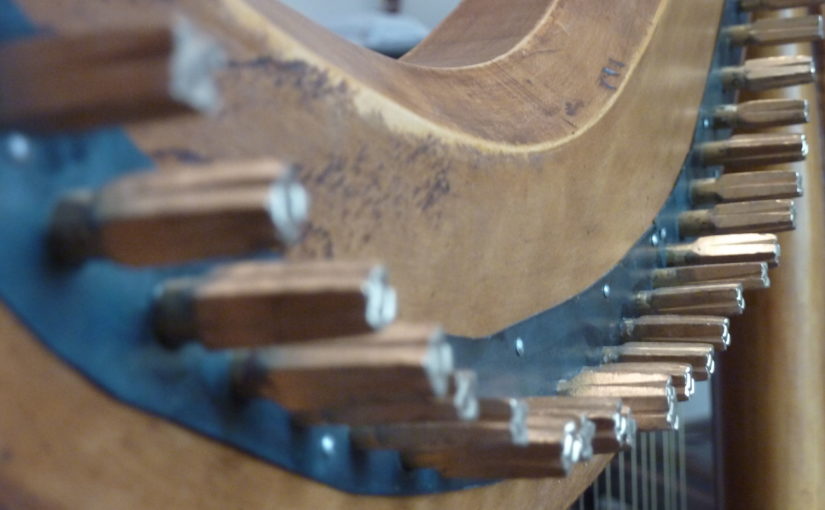
Making a set of pins
This post documents the making of a set of 29 tuning pins, starting with my turned brass pin blanks.
Continue reading Making a set of pins
Making the harp case
I made a case for the harp, and I photographed every stage so that I could show you the process. If you want some background to the design decisions see harp case part 1 and harp case part 2.
Continue reading Making the harp case
Harp case part 2
I’m busy making my harp case, which is why there has not been another tune for over a week.
As I was sewing I was thinking about things and I remembered a few references that I should have checked out before I started. But that is the way of these things.
Continue reading Harp case part 2
Cormac Ó Ceallaigh
I don’t know of any historical information about Cormac Ó Ceallaigh the harpmaker. Perhaps that’s not surprising for a Catholic at the times of the penal laws, living and working in a wooded valley up in the mountains, and working in an old oral tradition.
But there is a fair amount of traditionary information referring to him. By its nature this information may be wrong, but I thought I could try lining up what I have found so far, to collate all the different information, look for patterns, and maybe get ideas for future research or clues for other places to look.
Continue reading Cormac Ó Ceallaigh
Harp case part 1
From a practical point of view, seeing as how the case doesn’t affect the musical possibilities or performance of the instrument, there is no reason not to use the best case you can. In the past I have ordered cases from Glenn Cronkhite in California; his cases are extremely well designed and well made. I have three. But he has retired, and production has stopped.
There is also a legitimate research question about how harps were protected and transported historically. From a practice-based-research point of view we might want to experiment with using a reproduction historical case, to find out how well it protects the harp, and how it constrains or enables different performance contexts. Also, from a research-based-practice point of view, we might enjoy and even benefit from using a case made following historical models.
It’s curious that we seem to know more about harp bags, the further back in time we look. Some of the early medieval Germanic lyres even retain fragments of actual bags adhering to the decayed remains. Martin van Schaik wrote an interesting paper ‘The harp bag in the middle ages’, published in Aspects of the Historical Harp (1994) which discussed illustrations of harp bags as well as Irish and Scottish literary mentions.
Peter Holman, ‘The harp in Stuart England’, Early Music XV 2, May 1987, draws attention to a bill written out by the harper Cormack MacDermott:

Itm for putinge of a newe backe to yro Loxs. harpe
and mending of it wth plate where it was broken
and cutinge /the necke shorter ——————————– xvi sfor a lether case wth a chine and lynde wth
cotton for yor Lox: harpe ———————————– xxx sReceived by me Cormack dermode
Tristram Robson, in his thesis The Irish harp in art music (1997) adds that the bill is endorsed on the back: “item 46 shillings, Cormacke, bill of the 20th May, 1607”.
I was curious about the word “chine”. I suppose it might be read as “chire” or some other word but I think “chine” is the most plausible reading. Chine is not a very common English word; I know it from my youth as a kind of unstable steep-sided ravine; and also for the sharp angle along the side of certain types of boat hulls. I note that other meanings focus on the ridge (rather than groove) meaning and so I wonder if Cormack’s case had some kind of ridge? I have not found references to chines in specific leather-working contexts.
The other thing of interest in Cormack’s bill is the case being lined with cotton. I would expect something like this to have been lined with linen instead; it was not until the Restoration in the 1660s that cotton Calico and Chintz were introduced to the English market. A common type of fabric before then, back to medieval times, was fustian, which is a cotton-linen blend. But would Cormack have itemised a fustian lining as “cotton”? Another possibility is that the “lining” was actually a padded stuffing of cotton-wool.
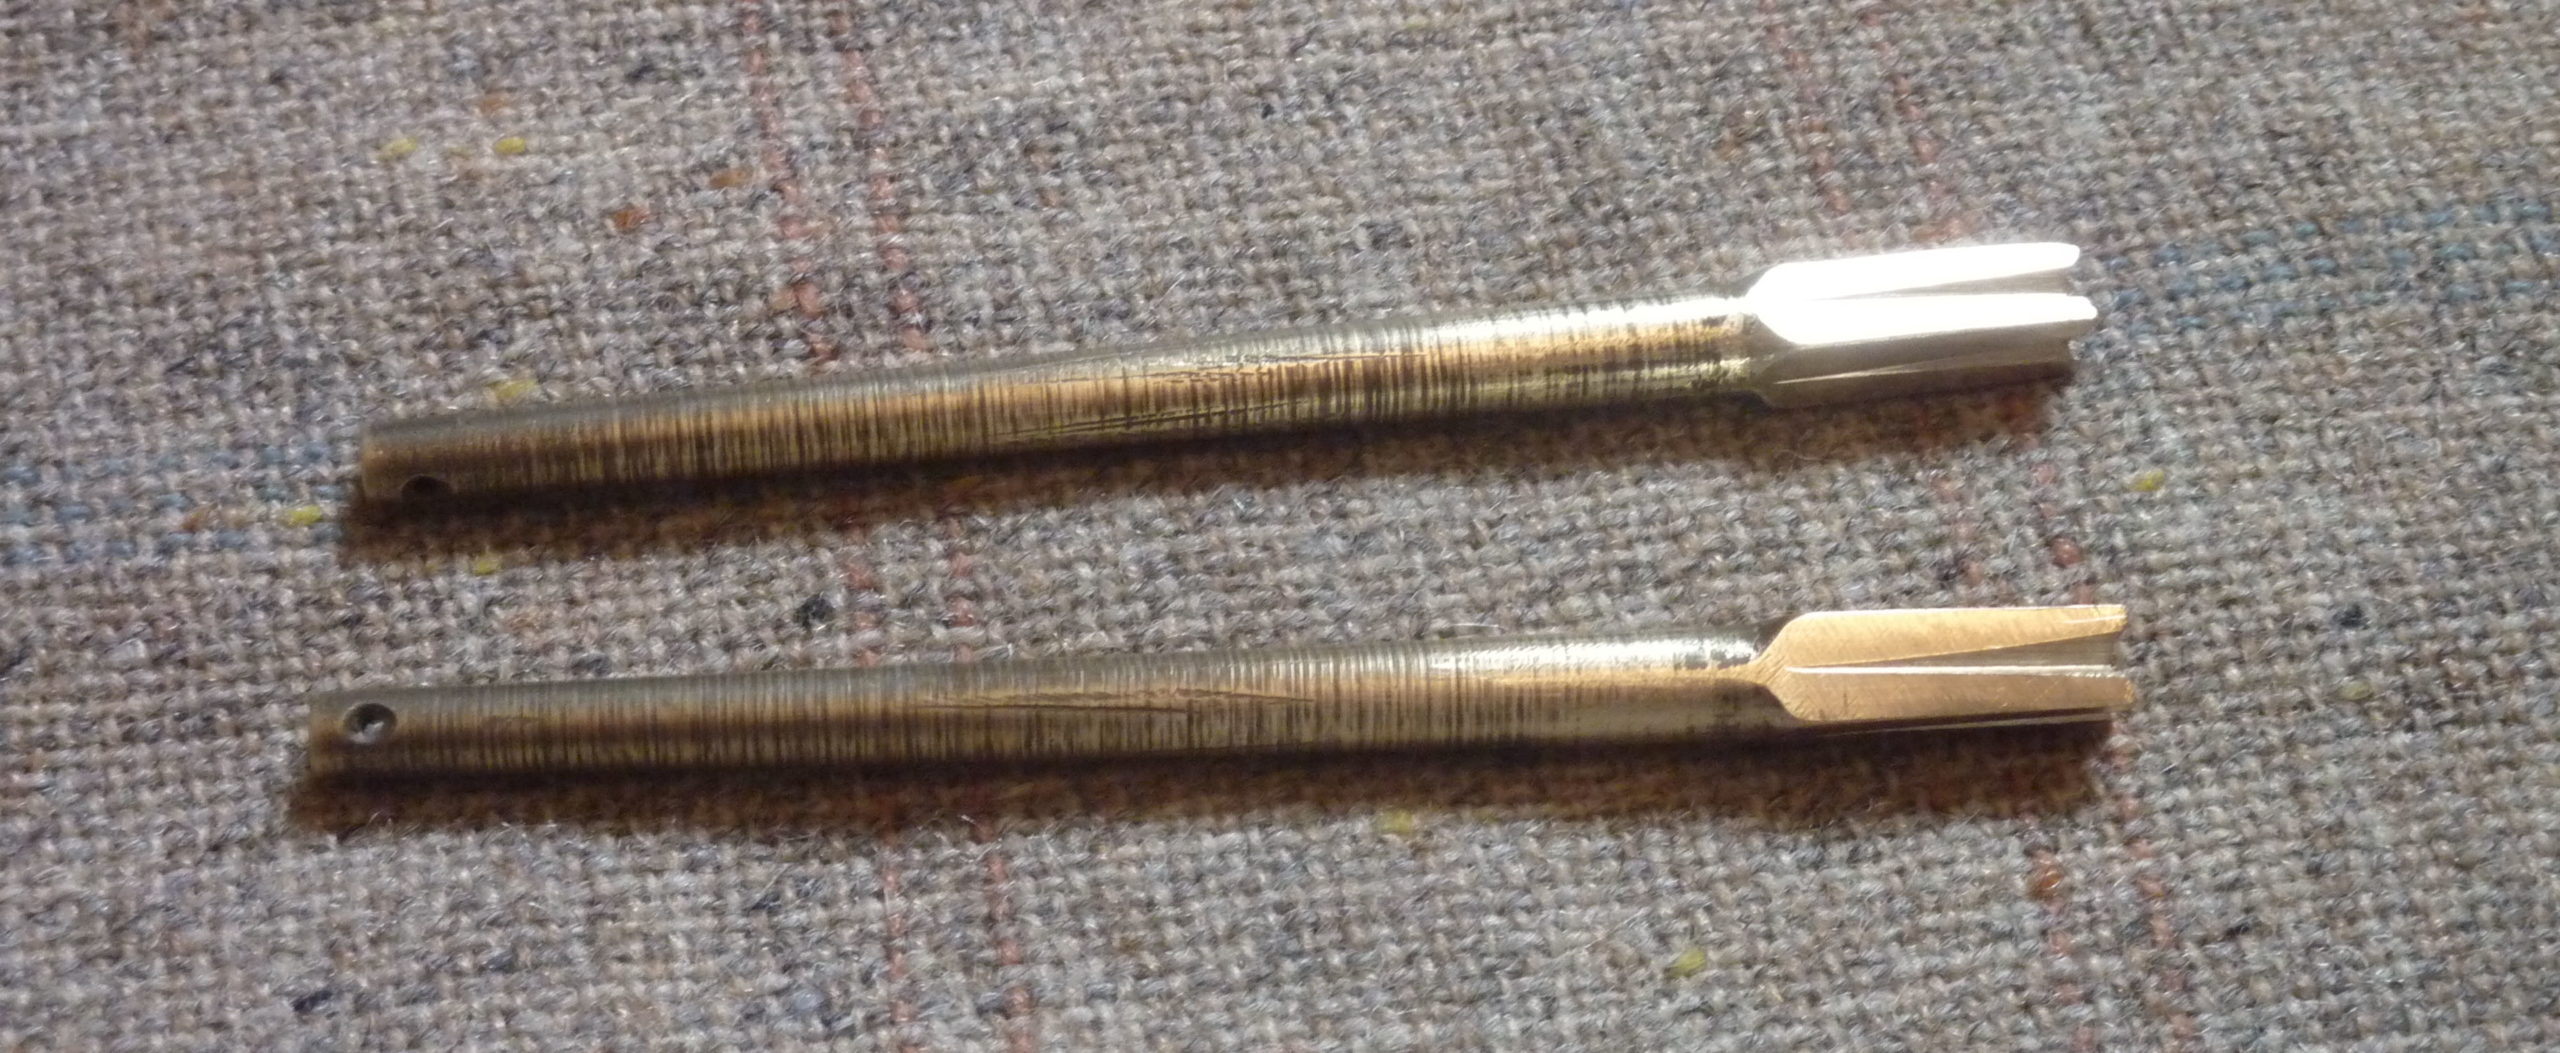
Making tuning pins
This post describes my method of making tuning pins. It is a labour-intensive process and though I am taking orders for sets of pins, I think my pricing does not really cover the work involved. But I want there to be more harps with beautiful handmade pins! I’m posting this so that if anyone else wants to take on the manufacture and supply of pins like this, they can get some ideas from what I have worked out.
Design
I want my pins to be the same as the old Irish harp pins. This is harder than it sounds because it is very difficult to accurately measure the old pins. I have been studying a combination of photographs of the old pins, and accurately calibrated laser-scans. The problem with the laser-scans is that there are a lot of scanning artefacts on the tuning pins; the problem with photographs is that perspective and parallax makes the tapers and exact sizes very difficult to assess.
For the reconstruction copy of the NMI Carolan harp, I chose one of the pins and made a paper template full-size from the laser-scan. I am also interested in copying some of the archaeological pins such as the ones from Montgomery Castle. It is also possible to come up with a kind of generic design pin that is not an exact copy of any one old pin, but which fits into the general scheme.

I also tried making resin casts of the Monaghan pin, but this is not a particularly good pin since the shaft is not parallel and circular. Even then it was very hard to accurately measure its size.
I think that for functioning pins we need to control the taper and diameter of the shaft, and we need to control the taper and width of the drive. I am doing this by using commercial standard tapered shafts, and then hand-shaping the heads to fit with standard sized gauges.
Shafts
I’ve been using Dan Speer‘s brass shafts. I haven’t yet found a supplier in the EU; but Dan is efficient and friendly to deal with. I also ask Dan to drill the string hole for me. I ask him to make the hole a bit smaller than usual, and closer to the end. The blanks are expensive, and so is shipping and import duty.
I have been experimenting with different size blanks. They are sized according to the Imperial taper system, with a 1/48 taper. The blanks are specified by a length and a number; the number refers to the diameter of the large end of the pin. This means that the longer the pin, the smaller the small end is. Sometimes I cut the wide end of the head off to make the blank shorter; this of course makes the whole pin more slender than if I had used a shorter pin of the same number.

Heads
For the heads, I buy square-section brass rod. This is available in standard sizes. The rod needs to be at least as wide as the wide end of the shaft; so for no.4 shafts I would buy 1/4″ (6.4mm) square rod. If I am using no.5 pins, then I need to get the next size up which is typically 3/8″ (9.5mm). Ideally the rod should be about the same size, so for no.5 pins the rod should be 7.5mm, because anything bigger than that will just need filed away.
Assembling heads and shafts
The head is cut from the square rod with a hacksaw. For consistency, I use a caliper / divider to mark the length of the head.
The shaft can be used as is, or can be cut down. I started making my pins using the blanks as is, and then I realised that this made my pins a bit thicker than modern machined harp pins of the same nominal size. That’s because I was adding the head to the wide end of my pin, whereas a modern machine-made pin cuts the head down into the wide end of the blank. So, my preference now is to cut a short length off of the wide end of the pin.

In the example from my notebook, I would cut the head from 1/4″ square brass rod, cutting a piece 18mm long. I would take a pin blank, #4 x 3 1/2″ (i.e. no.4 x 89mm). I would mark 75mm from the small end, and cut off the remainder of the fat end.
Then I would carefully file the cut ends flat, so that they would fit together closely.
I use a blowtorch and silver-solder to join the shaft and the drive. This is tricky and precision work. I use firebricks to hold the pieces together under their own weight, standing the shaft wide-end-down on top of the head, with just a nice amount of flux powder. When they are almost red-hot the solder can be touched to the joint to melt in, and then more heating will bring the brass to red-hot and the solder will flow throughout the join and make nice wide fillets at the four corners of the head.


Then the heads are filed. Care is needed to make the inner, wider end of the head just flush with the shaft; the outer, narrower end is tapered gradually down.
I use standard clock-keys as measuring gauges to judge the taper of the heads; for the example no.4 pins my notebook indicates how far onto the tapered head two clock keys will fit; a no.13 (5.5mm) key will fit about halfway down the drive, and a no.12 (5.25mm) key will fit just a few mm down the end of the head. I think I would use a 5.75mm socket on a tuning key for these pins.

Finally, the V-shaped grooves on the drive are made, with fine needle files. Different original pins have different configurations of these decorative grooves; their specific shape and depth gives a lot of the character to the pins. For these no.4 pins I made the grooves on the drive faces very deep and tapering; the diamonds on the drive ends were also cut very deep and then shaped to give a “clove” effect. Other pins I have made have much shallower grooves which give a more two-dimensional look, more like engraved lines. Some pins also have lateral incised lines running around the drive end.
I don’t believe this is how the old craftsmen made brass tuning pins. I think it is much more likely that the old pins were cast and/or turned on a lathe. I have seen modern cast and turned copies of the old pins, and they look very nice. But I don’t have either foundry equipment, nor a lathe. Also it seemed important to me to fit in with modern norms and to use the modern 1/48 Imperial taper shafts, just like other harps.
My header image shows the pins I made for the reconstruction copy of the NMI Carolan harp, which was made for me by Pedro Ferreira.

Replica harps & portraits of harpers as a source for performance practice
In 2018, I did a session at Scoil na gCláirseach in Kilkenny, about connecting to the old Irish harp tradition, and understanding how tradition worked. As part of that session, we sat with replica harps and looked at the portraits of the old harpers. I had not really prepared that aspect of the 2018 workshop, and so it was a bit ad-hoc. But afterwards, I realised that this was a very powerful tool for understanding and re-imagining the lost old Irish harp traditions.
Part of the point of that kind of work is acknowledging that the present day living practice of harp playing in Ireland is not part of the inherited indigenous Irish harping tradition. The inherited tradition came to a final end in the 19th century, with the death of the last tradition-bearers, who did not pass their tradition on to the next generation. Post-19th-century harp-players in Ireland have had to invent their practice anew, mostly by borrowing heavily from Anglo-Classical practice (many common features of present day practice, e.g. gut strings, semitone mechanisms, right orientation, harmonic arrangements, colour-coded strings, show Anglo-Continental classical lineage)
My idea was that we can try to re-connect to the broken end of the old Irish harp tradition by trying to imitate the last of the tradition-bearers. If the old harpers were still alive, we could sit beside them and copy their playing and share their tradition. We can’t do that because they’re all dead for over a hundred years; but we can try to imitate them as closely as possible by looking at what information we do have about their practice.
For some of the old harpers we have a huge amount of information. Patrick Quin is probably the most important; we have the amazing portrait discovered by Sylvia Crawford; we have the harp that he is playing in that portrait; and we have very explicit, clear and complete transcriptions live from his playing, done by Edward Bunting in around 1800. Denis O’Hampsey is also important, since we have the engraved portrait of him, we have the harp that he played, and we have Bunting’s transcriptions of his playing, though the portrait is less life-like and the transcriptions are more problematical. For other harpers, we have other information, less complete. For some we have transcriptions; for others we have harps that may or may not have been played by them; for some we have more biographical details.
But there is plenty enough to be getting on with, by applying ourselves in an honest and all-consuming attempt to play the old Irish harp by carefully and meticulously imitating the practice of the tradition-bearers.
The portraits, the old harps, and the manuscript transcriptions are our guidelines.
For Scoil 2019 this past August I led a participatory workshop titled “Replica harps & portraits of harpers as a source for performance practice”. The aim of this session was to explore what information the harps and portraits could give us. The portraits are simple enough, in that they show us posture and hand position (though there was some interesting discussion about the limitations of the portraits, and the different nature of the different portraits).
I spent more time talking about the old harps, and the value of really accurate “archaeological” reproductions of them, and what both the originals and the modern copies could tell us about how they were used in the old tradition.
The highlight for me was to have so many really top quality copies of a selection of the old harps lined up, and to have willing volunteers to sit in front of one of the portraits, and hold the appropriate replica harp, and try to copy the details of posture and hand position demonstrated by the old harper.
The video of the session is almost one hour long, but if you are interested in the process of trying to re-connect to the broken end of the old Irish harp tradition, you might find it of interest.
Thanks to Brian Doyle and ITMA for filming the session, and to Siobhán Armstrong and the Historical Harp Society of Ireland for hosting it. Thanks also to Michael Billinge and Aoibheann Devlin for the loan of their instruments.